Build a community website with ttrek

A community website gives people a place to meet between meetings. Members can
ask questions, share useful notes, and tell everyone what is happening next.
example-community gives you those pieces in a working site you can copy and
make your own.
The example is called Juniper Yard, a fictional neighborhood garden and workshop. You can turn it into a home for a club, a project, a local group, or people who share an interest. It includes accounts, discussions, a shared notebook, and a journal.
For a simpler first project, try the personal site. This guide adds the next step: letting people sign in and contribute. You will run everything on your computer, create a test account, and try the site as a visitor, a member, a moderator, and an administrator.
1. Get your tools ready
You need a terminal, a text editor, a browser, and ttrek. Follow Getting started to install ttrek and the build tools. Package installation needs an internet connection, and the first run can take a while as dependencies are built.
2. Clone the example
Open a terminal in the folder where you keep your projects:
ttrek clone example-community -outdir my-community
cd my-community
clone gives you your own copy of the example's files. -outdir names its new
folder; choose a new or empty folder. You can change this copy without changing
the original example.
The project includes ttrek.json, which lists the packages it needs and the
command that starts the website.
3. Install and run locally
From my-community, run:
ttrek install -y
ttrek run -script start -- --port 8081
install gets the packages listed in ttrek.json. -y accepts the installation
plan. The start command runs start.sh, and --port 8081 chooses the numbered
door where the server listens. The -- separates ttrek's options from the
options passed to the site.
Open http://localhost:8081. localhost means “this computer.” Leave the
terminal running while you use the website. Stop the server with Ctrl-C;
start it again with the same command.
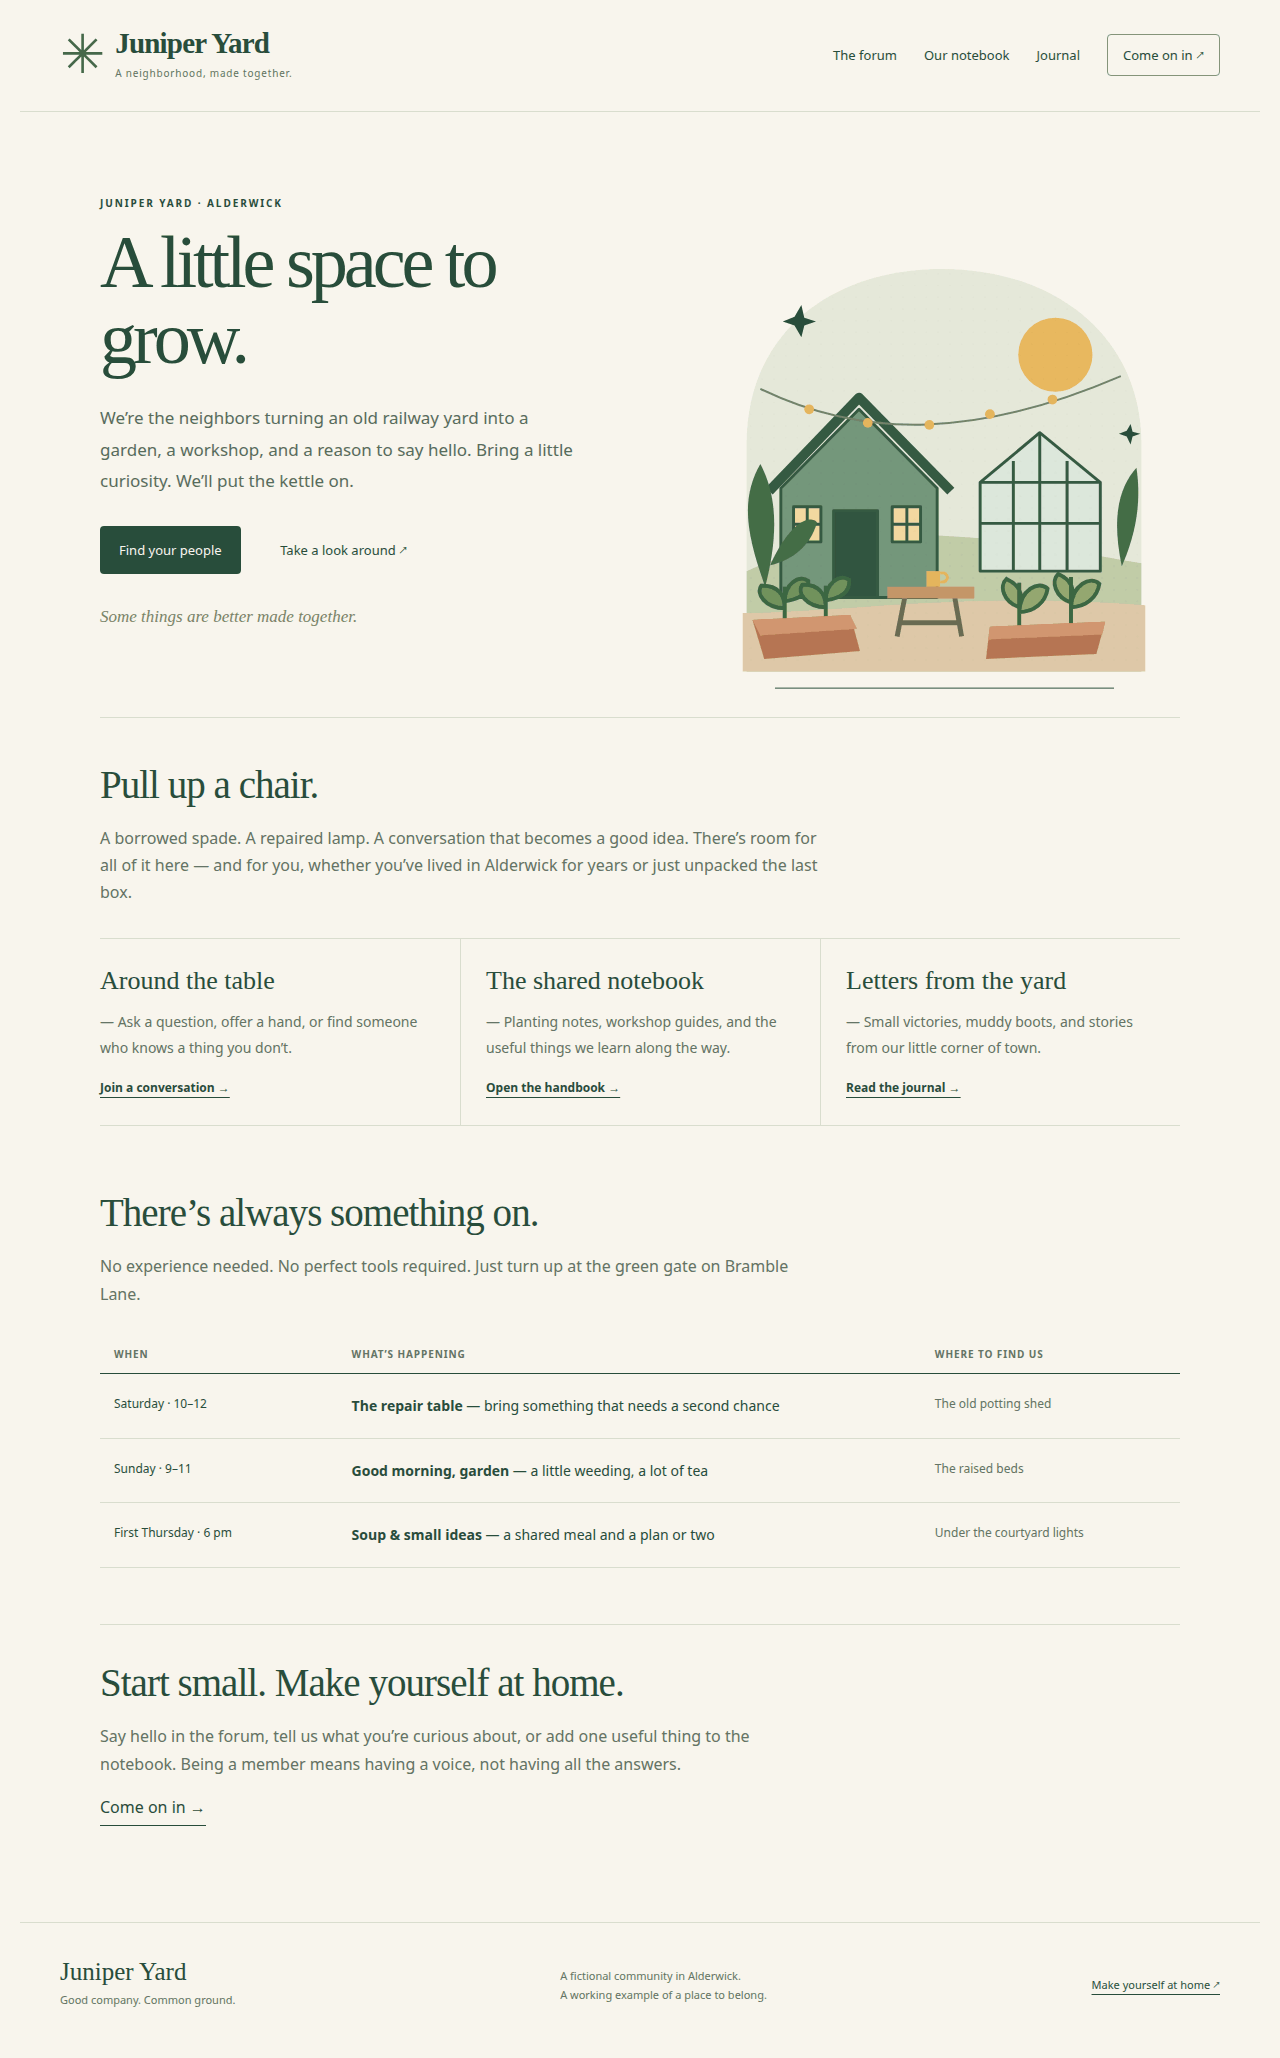
Juniper Yard is the sample community. Its accounts and discussions work, ready for you to try them.
The example starts in LOCAL mode. It creates a SQLite database, a file that holds the site's records, and shows verification codes in your browser. You can follow this walkthrough without an AWS account or an email service.
4. Create an account and sign in
An account gives your contributions a name. Registration creates the account; signing in lets the website recognize you on later visits.
Create your account
Click Come on in, then Create an account. Enter an email address, first
name, last name, and a password. For this local exercise, use fictional details
such as mira@example.com, Mira Fern, and a password you use only for this demo.
Your first name is the public name shown beside your posts.
Click Create account. The next screen asks you to verify your email address.
Enter the verification code
Copy the LOCAL development code shown on your screen into Code, then click Verify email. Use the code from your own browser session.
On a live site, this step checks that someone can receive mail at the address they supplied. LOCAL mode puts the code on the page so you can try the whole flow without sending email.
Sign in
Enter the same email address and password on the sign-in form and click Sign in. Stay signed in keeps the session on that device for later visits; leave it unchecked on a shared computer.
The account page confirms that you are signed in, and the navigation changes to Your account. The browser keeps a session cookie, like a small pass that lets the site recognize you as you move between pages.
From Your account, you can change your password, edit your profile, and set up an authenticator app. Start by exploring the community before changing those settings.
5. Start a conversation
Click The forum, then Start a discussion. Give it a useful title, such
as What should we make at our first meetup?, and write a short message:
I would like to start with something small that we can finish together.

- Repair a simple household item
- Plant a box of herbs
- Share a favorite tool

What would you like to try?
Click Post. Your discussion appears with your public name beside it. Add a reply beneath it to try the conversation flow.
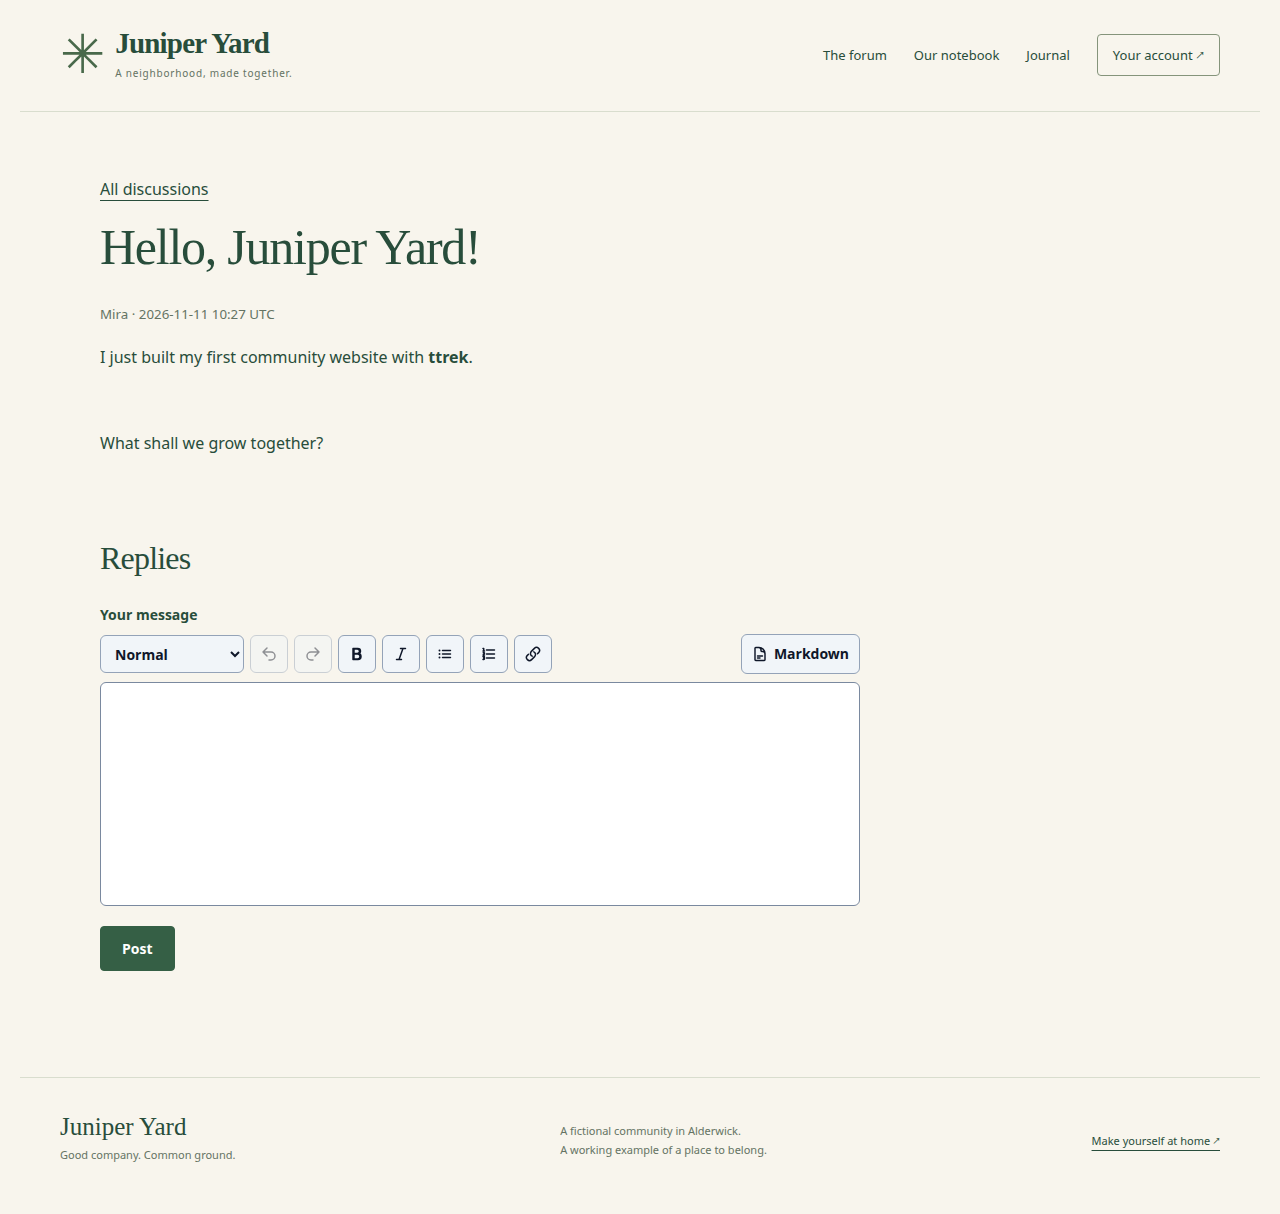
A discussion keeps a question and its replies together, so the next person can join without needing to catch up on a separate chat.
Markdown is plain text with a little formatting. **words** makes words bold,
and a line beginning with - becomes a list item. You can use the editor's
visual controls or write Markdown directly.
The discussion list starts with Newest topics. Choose Latest activity to find conversations with recent visible replies. Use Next and Previous to move between pages, and click an author's name to visit their forum profile.
6. Add something useful to the notebook
A discussion is for a conversation. The notebook is for information people will want to find again: how to join a meeting, where shared tools live, or how to complete a task.
First, give your account permission to edit. In config.ini, set editor in
the existing groups and permissions sections, using the email you verified:
[groups]
editor = mira@example.com

[permissions]
editor = wiki.edit, blog.edit
Restart the site. wiki.edit lets you create and edit notebook pages, including
the homepage. blog.edit does the same for journal posts. You can give someone
just one of these permissions. Signing in alone does not grant editing access.
Click Our notebook, then New page. Enter First meetup as the title and
add:
# First meetup

Everyone is welcome. Bring one idea and something you would like to learn.

## Before we meet

- Introduce yourself in the forum
- Suggest a small activity
- Read the community handbook
Click Publish page. Here, publishing saves the page on your local community
site. Other members with wiki.edit can help improve notebook pages too.
Open the page again, choose Edit, make a small change, and click Publish revision. The page updates immediately. Revision history lets you see how the writing has changed.
Use Journal → New post for dated updates, such as a meetup announcement or notes from a finished project. Enter a title, publication date, and text, then click Publish post.
7. Give your team the right access
A growing community needs a few people who can look after it. A group is a list of people; a permission is something that group is allowed to do. Think of the group as a team and its permissions as the keys you give that team.
In config.ini, update the existing [groups] and [permissions] sections:
[groups]
admin = mira@example.com, rowan@example.com
moderator = alex@example.com
editor = rowan@example.com

[permissions]
admin = forum.moderate, wiki.edit, blog.edit, users.manage
moderator = forum.moderate
editor = wiki.edit, blog.edit
Use your own members' email addresses when you make the site yours. For this walkthrough, keep Mira's address so the account you created earlier can try all the tools. These entries replace the corresponding entries in the existing sections; keep the rest of the configuration in place.
Stop and restart the site. Mira and Rowan can now moderate discussions, edit
the notebook and journal, and open the user directory. Alex can moderate the
forum. Members without those permissions can still start discussions and reply.
The group name admin is just a name: its permissions line gives it access.
You can list someone before they register. Their group permissions take effect once they have registered and verified that email address. To remove someone's access, remove their address from the relevant groups and restart the site. Someone in several groups receives the permissions from all of them.
The screenshots below come from a running local copy of example-community,
using four fictional members: Mira, Rowan, Alex, and Sam.
8. Look after the conversations
Moderation helps a community stay welcoming and useful. A moderator might check that a new topic belongs in the group, hide a duplicate reply, or close a finished discussion so people know where to find the final plan.
Sign in as Mira and open The forum. With forum.moderate, you see three
additional links: Pending moderation, Hidden posts, and Moderation
history. Other members do not have access to these tools.
Review new posts before publishing
By default, new discussions and replies appear immediately. To put them in a
review queue first, change the existing setting in config.ini:
[forum]
moderation = true
Restart the site. The posting button now says Submit for review, and the form explains that a moderator will check the contribution before it becomes public. This setting applies to both topics and replies, including submissions from moderators themselves. A topic already published stays published.
Try the whole flow:
- In another browser profile, create and verify a second account, such as
sam@example.com, then sign in. Using a separate browser profile lets you keep Mira signed in at the same time. - As Sam, submit a discussion called What should we plant in the shared herb box? Add a short message asking which herbs would be easy to grow. Sam can open the discussion and see that it is waiting for approval.
- As Mira, choose The forum → Pending moderation. The Topics tab shows waiting discussions. Replies shows contributions to existing discussions.
- Read the message and choose Approve to publish it, or Reject to keep it out of the public conversation.
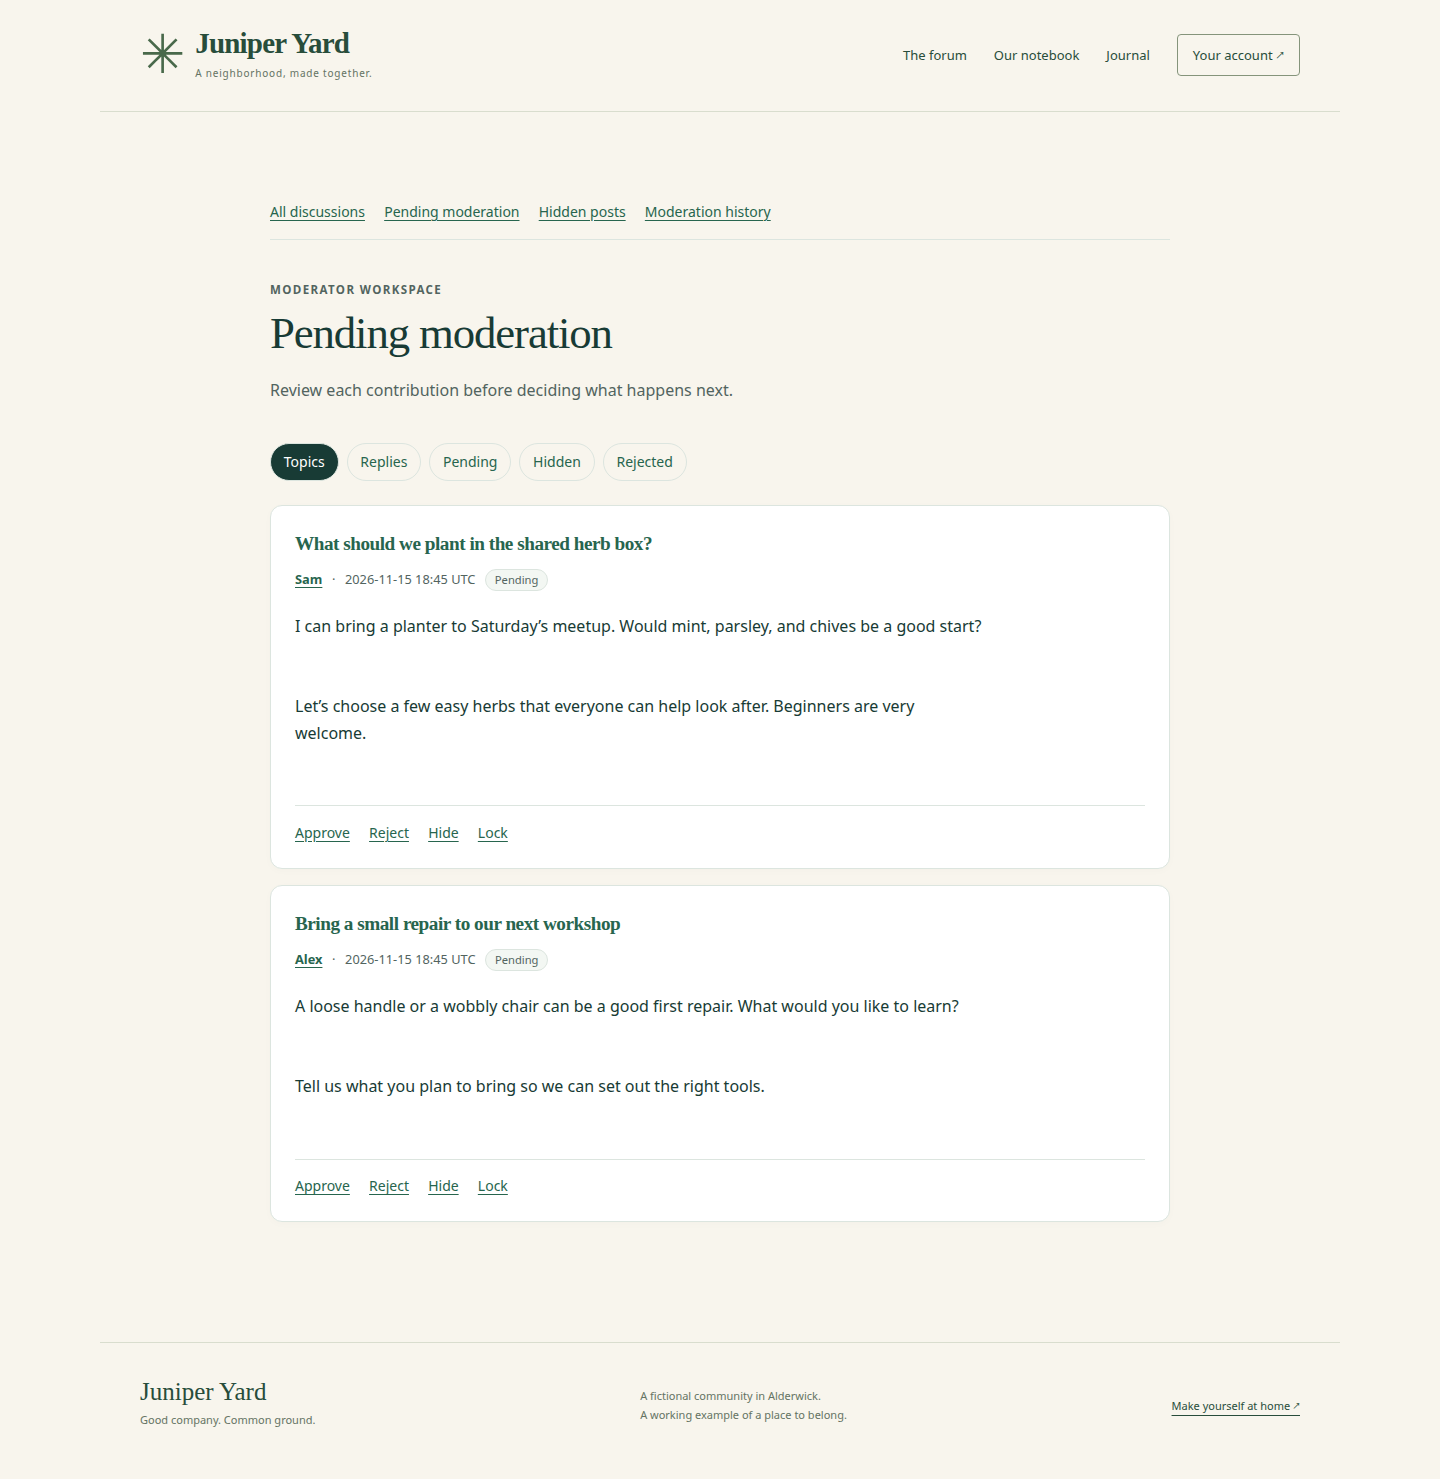
The queue shows the actual message, so a moderator can read it before making a decision. Switch between Topics and Replies to check both kinds of submission.
Choosing an action opens a confirmation page. Enter a short, useful Reason, then confirm. For example, “A welcoming question with a clear plan for our next meetup” explains why the herb-box discussion is a good fit. The reason is saved for the moderation team to read later.
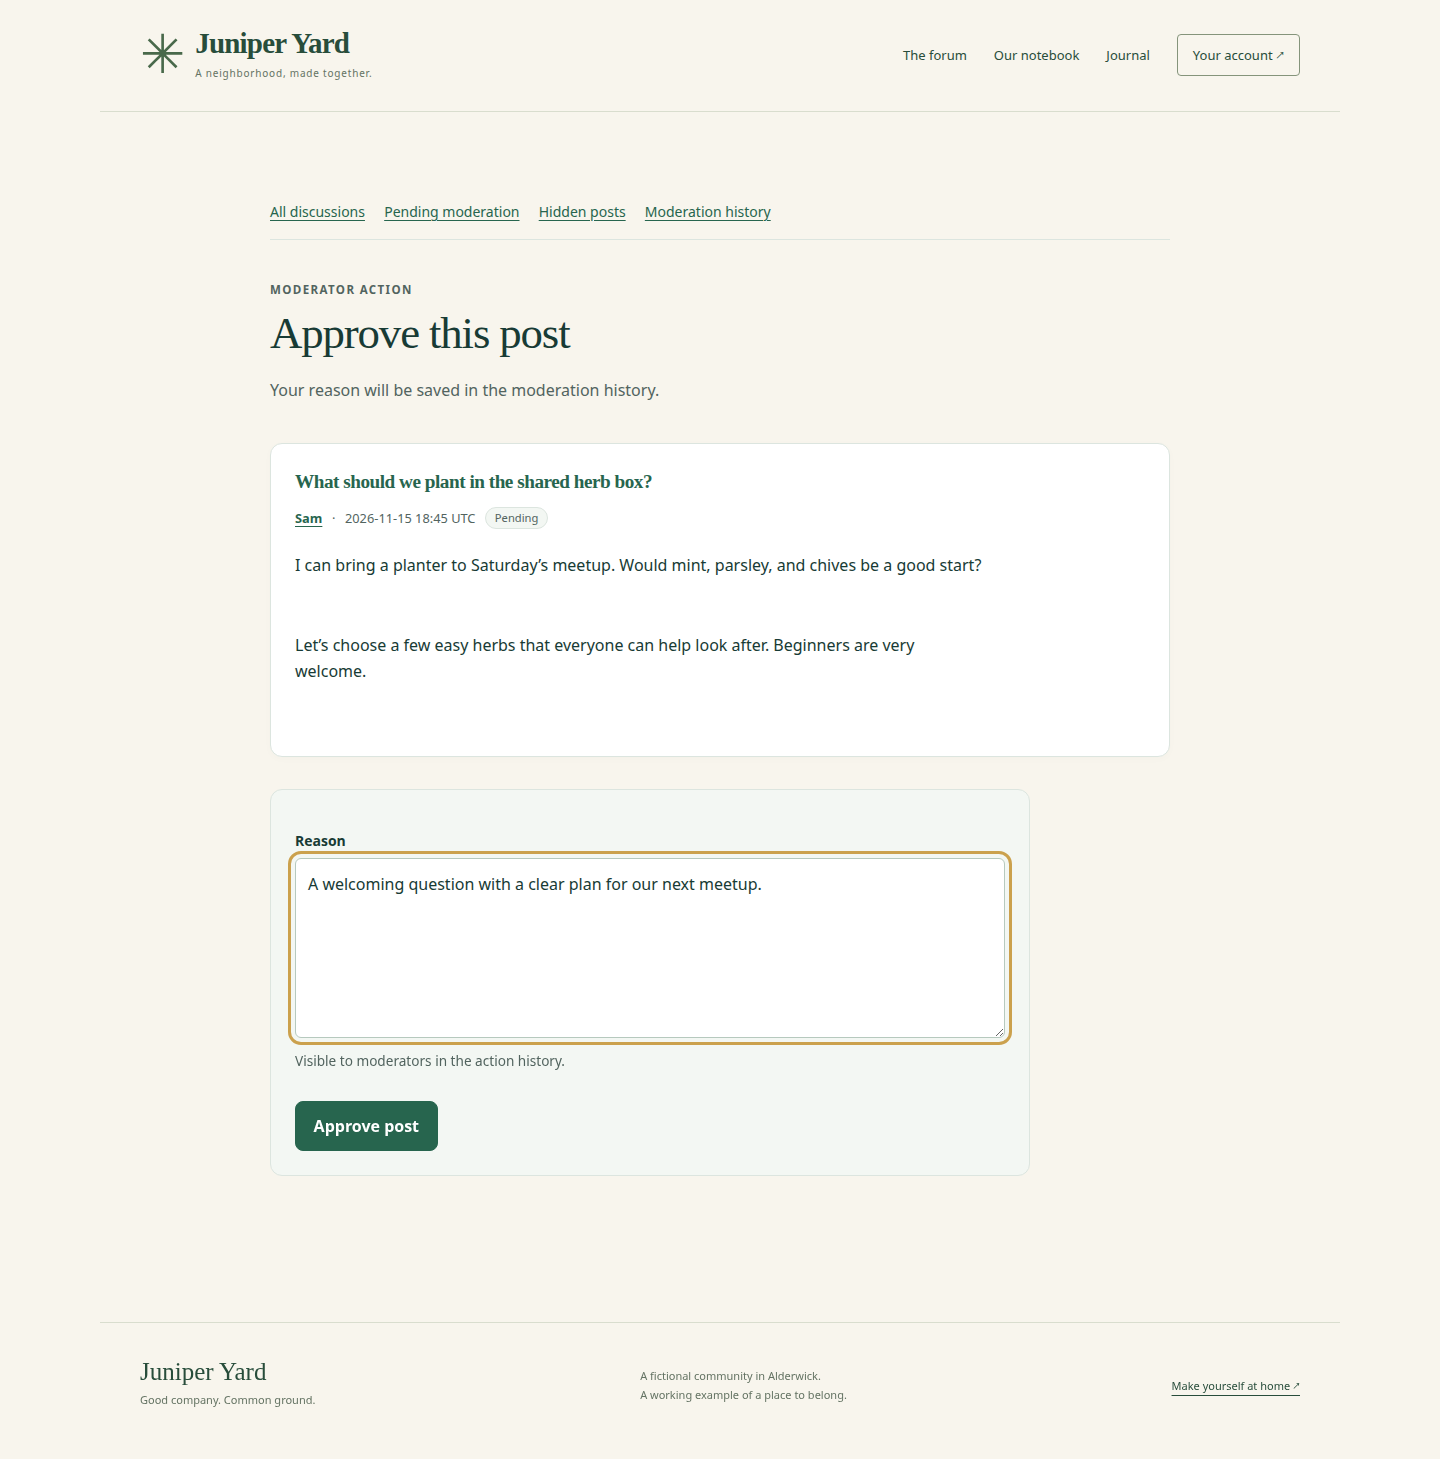
Opening the action page gives you a chance to review the contribution and explain the decision before saving it.
After approval, the discussion is public and members can reply. With moderation still on, each reply goes through the same review step. Rejected in the queue's filters lets moderators inspect submissions that were not approved.
Hide a post or close a discussion
Approval decides whether a new submission is published. You also have tools for looking after conversations that are already underway:
| Action | What it does | When it helps |
|---|---|---|
| Hide | Removes a topic or reply from public view while keeping its record. | A duplicate reply or a contribution that needs the team's attention. |
| Restore | Shows a hidden post again, once it is approved. | A post was hidden by mistake or can now return to the conversation. |
| Lock | Keeps a discussion readable but closes it to new replies. | The group has agreed on a plan and moved the final details into the notebook. |
| Unlock | Opens a discussion to replies again, provided it is published and visible. | The group wants to continue the conversation. |
Open a discussion to find its moderation links. Replies have their own Hide and Restore controls; Lock and Unlock apply to the whole discussion. Each action asks for a reason. Restoring a pending submission does not approve it, and unlocking a hidden discussion does not make it public.
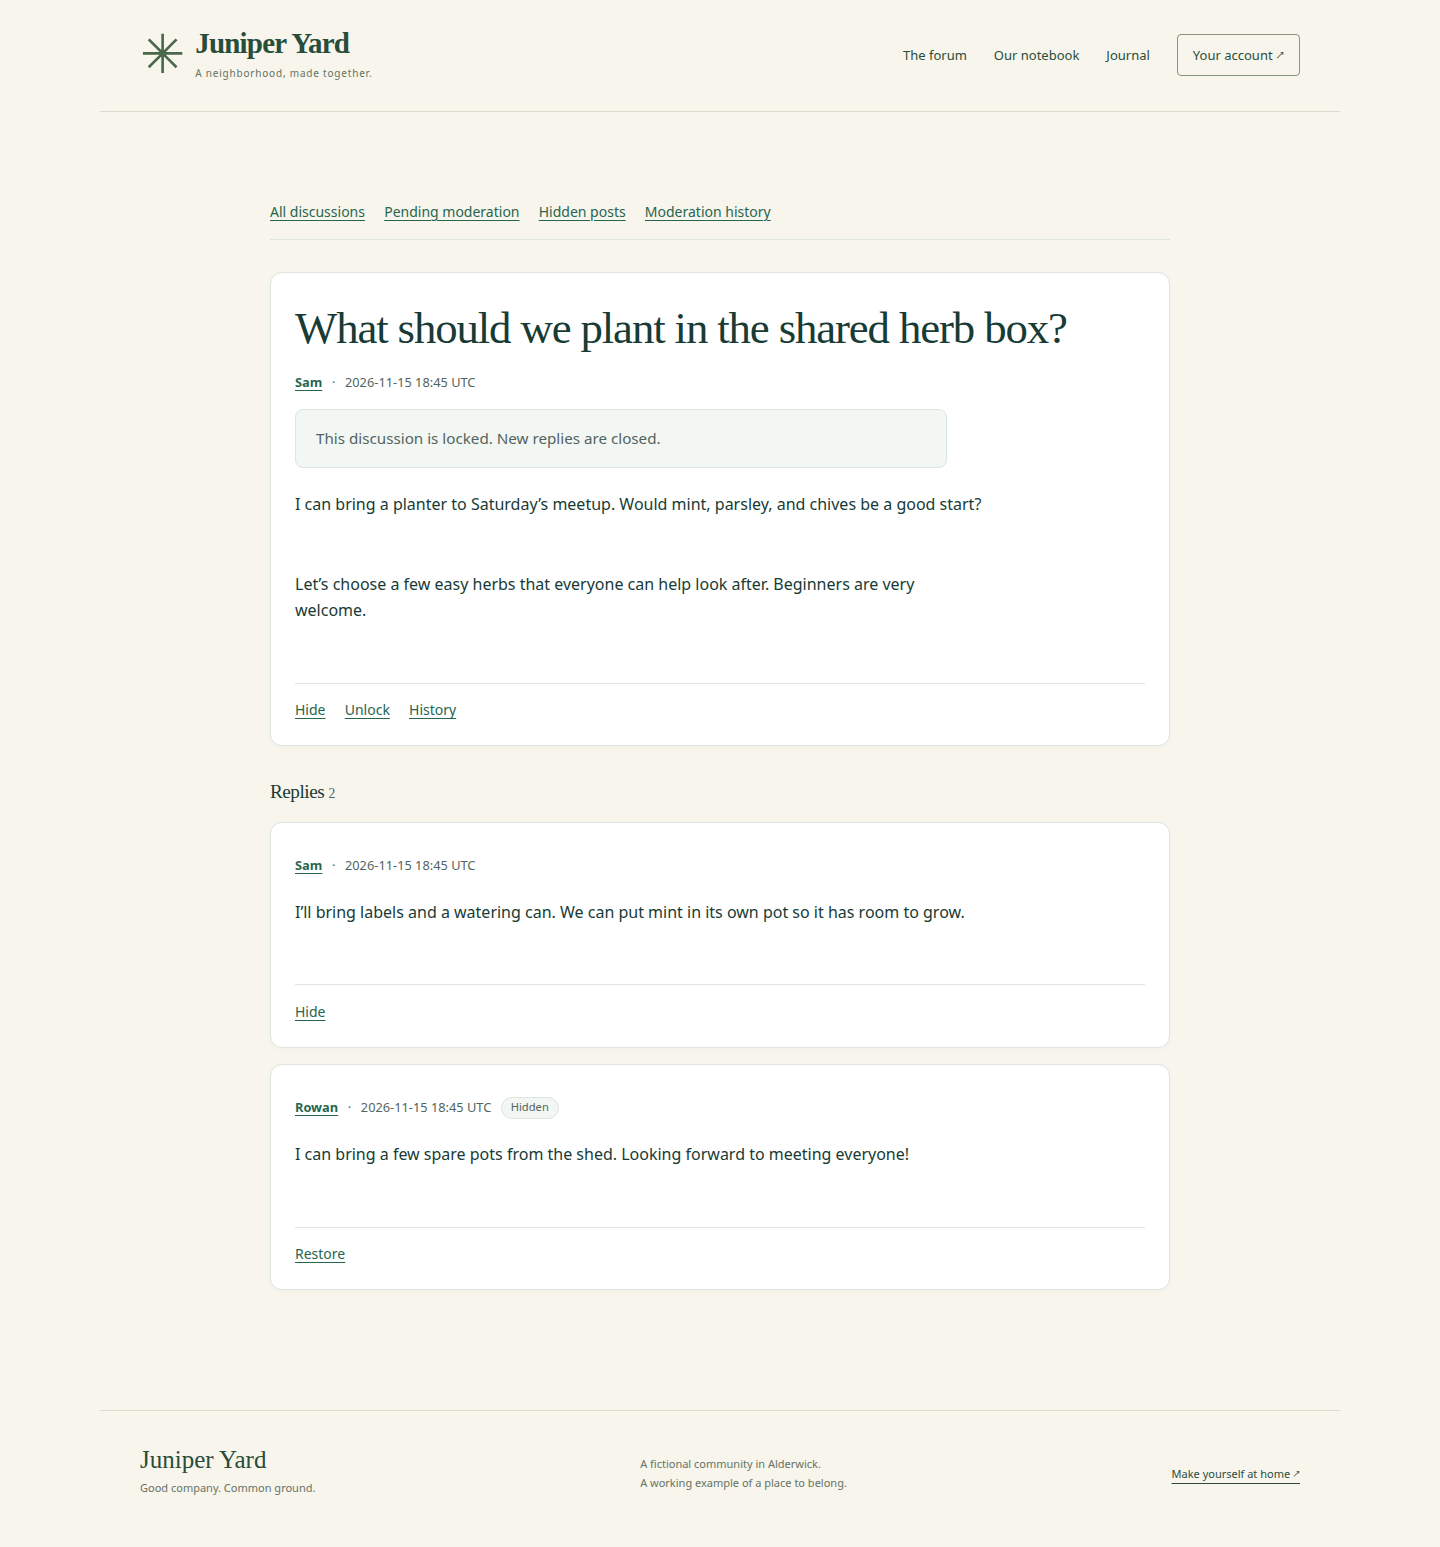
Here the planting plan is settled, so new replies are closed. The moderator can still see a hidden reply and restore it. Visitors do not see that hidden reply.
Use Hidden posts to find hidden contributions again, choosing Topics or
Replies as needed. These tools also work when moderation = false, so you
can let people post immediately and still look after the conversation afterward.
Leave a useful record for the team
Open Moderation history to see the action, the moderator, the time, and the reason. A discussion's History link narrows the record to that conversation.
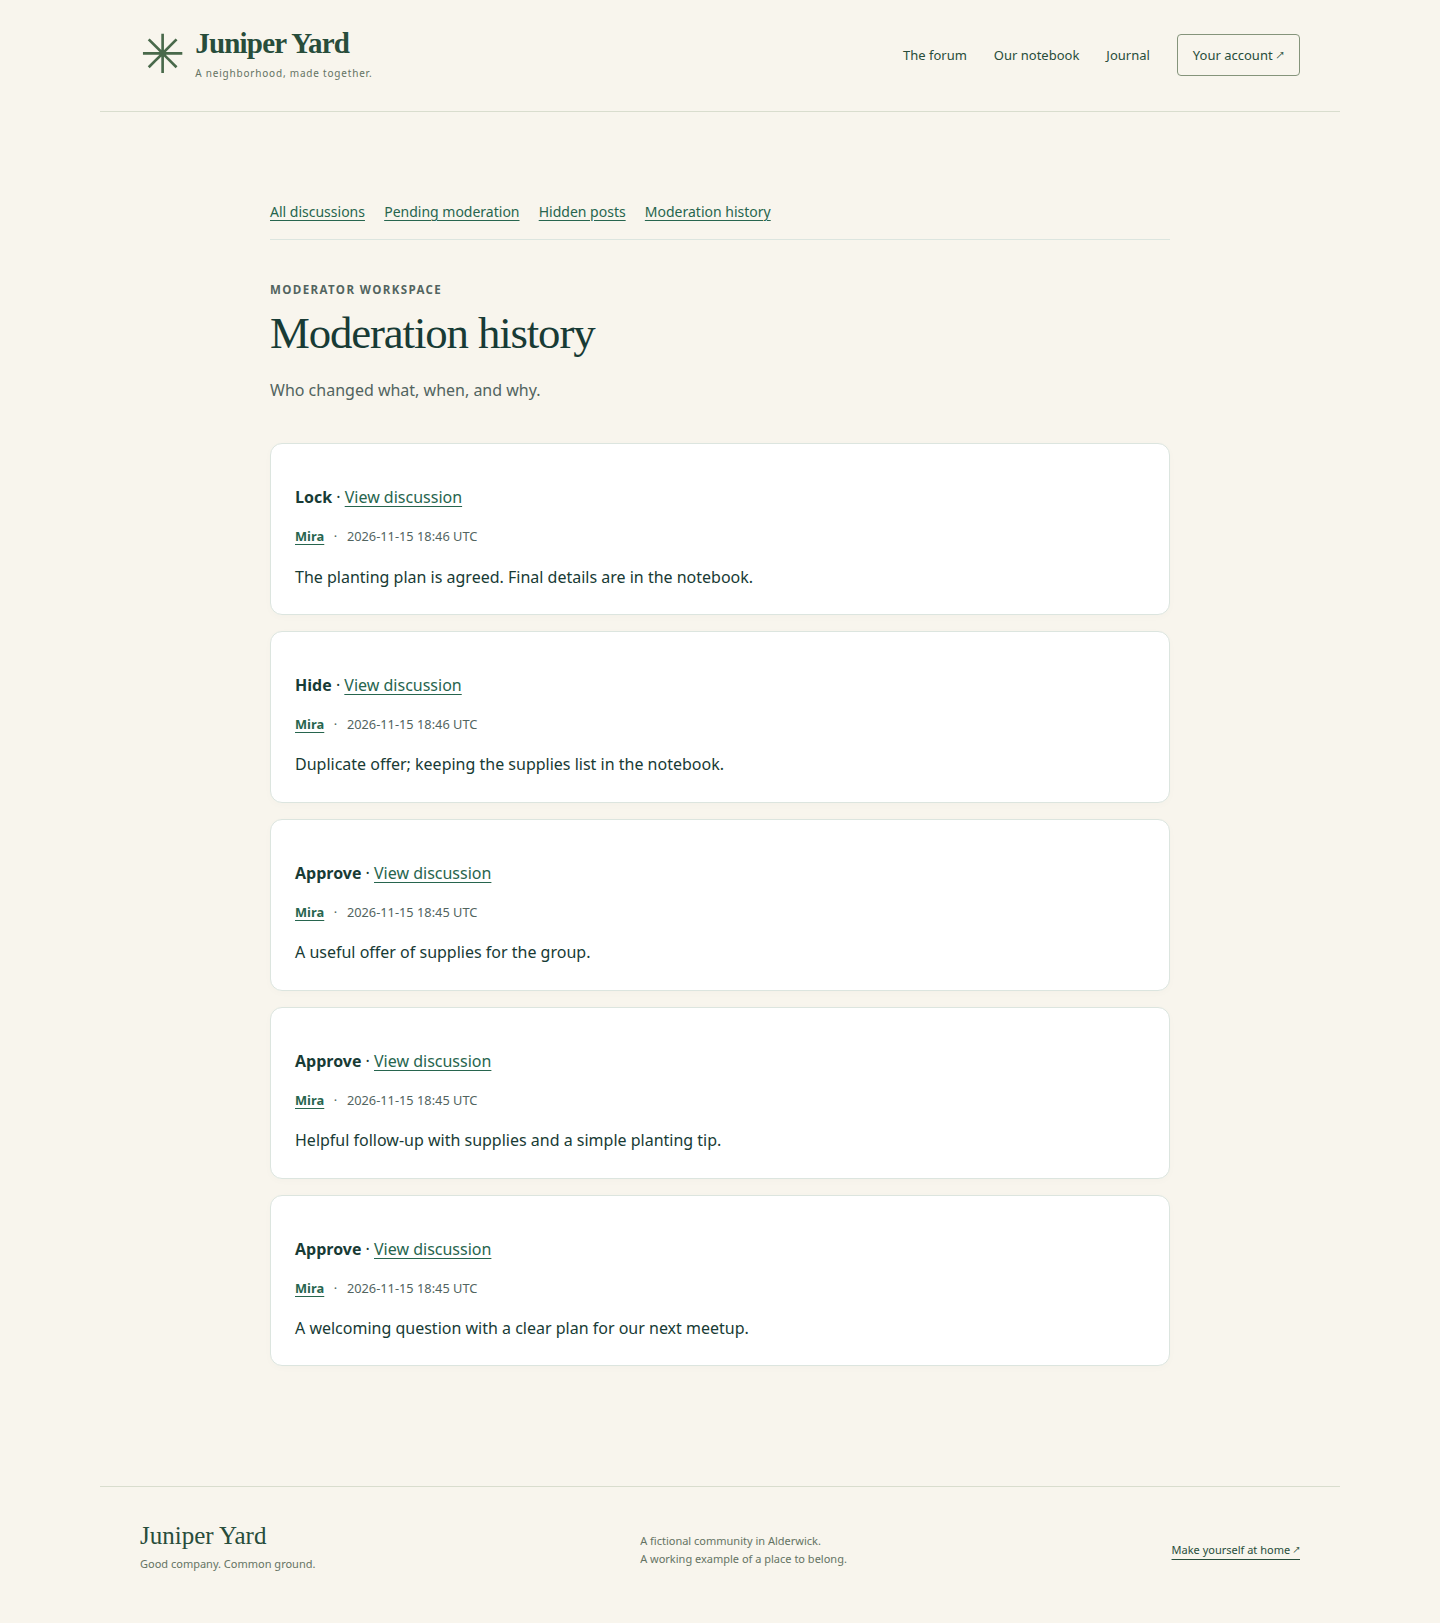
A reason such as “The planting plan is agreed. Final details are in the notebook” tells another moderator why the discussion was locked.
Write reasons that another person can understand without asking you. The history helps the next moderator pick up where you left off and makes mistakes easier to explain and correct. These reasons are visible to moderators.
Add a challenge before posting
To ask people to type the characters from an image before submitting, set:
[forum]
posting_captcha = true
Keep this setting alongside moderation in the existing [forum] section and
restart. The challenge applies to both topics and replies. It adds a check
against automated posting; moderation is still the step where a person reviews
the contribution. Both settings are off in the starting example.
9. See who has joined
As Mira, open Your account → Manage users. The users.manage permission
makes that link available and allows access to the page. A forum moderator such
as Alex does not receive it unless you also give their group users.manage.
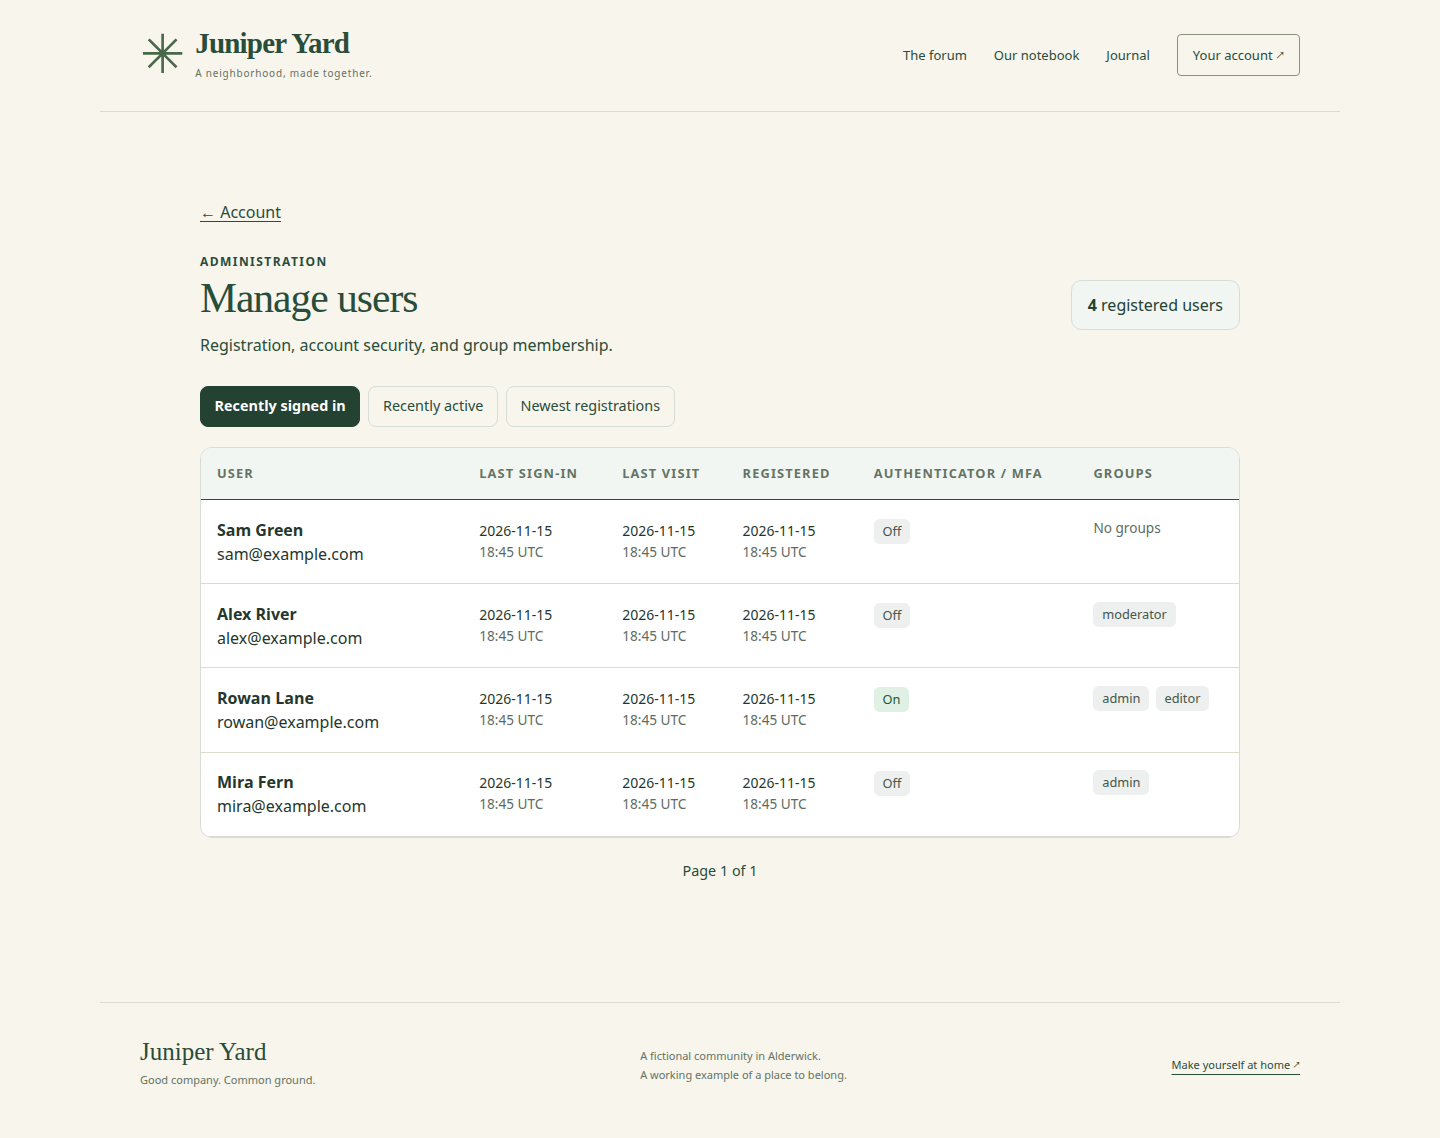
The directory brings account activity, security settings, and group membership together. Here Rowan uses an authenticator, Alex belongs to the moderator group, and Sam has an ordinary member account.
Use the page to answer practical questions: Has a new member joined? Has someone returned since signing in? Which people belong to the team that can moderate?
| Column | How to read it |
|---|---|
| User | The member's name and account email. |
| Last sign-in | When they last successfully signed in, including completing their authenticator step when enabled. |
| Last visit | Their most recently recorded activity while signed in. Browsing can update this without another sign-in. |
| Registered | When they created the account. |
| Authenticator / MFA | On means the account uses an authenticator app as an extra sign-in step. Off means it has not been enabled. |
| Groups | The configured teams the member belongs to. No groups is normal for a member who only needs to join discussions. |
Dates and times are shown in UTC. Last visit updates at most once a minute; it is a recent-activity indicator, not a live list of who is online. Not recorded means there is no timestamp for that activity yet.
The page starts with Recently signed in, with the newest sign-ins first. Choose Recently active to see who has been visiting, or Newest registrations to find new members. Larger communities get Next and Previous links, with 50 users per page; changing pages keeps your chosen order.
Manage users is an account directory. To change access, edit the email lists in
config.ini, restart the site, and return here to check the groups. Members
manage their own passwords and authenticators through Your account. For
example, Rowan can choose Set up authenticator, confirm the password, scan
the QR code with an authenticator app, and enter its current code. The directory
then shows On for that account.
10. Try the site as a visitor
Choose Your account → Sign out. The navigation returns to Come on in. You can still read the discussions, notebook, and journal. Posting in the forum requires signing in; editing the notebook or journal also requires its permission.
This is an easy way to check your site's two experiences: what a visitor can read, and what a member can contribute. Sign back in to continue making changes.
11. Make the community yours
Start with the name. Open config.ini and change site_name under [site]:
[site]
site_name = Saturday Makers
Edit that setting in the existing file, keeping the other settings in place. Stop and restart the server, then refresh your browser. The new name appears in the shared layout.
Next, sign in, open the homepage, and choose Edit this page. Keep its title for your first edit and replace the sample paragraphs with a welcome to your group. Save the revision and return to the homepage to see your words.
| File or part of the site | Think of it as | What to change |
|---|---|---|
config.ini |
The site's settings | Community name and account preferences |
assets/page.html.jinja |
A frame around every page | Navigation, footer, and the short tagline |
assets/home.html.jinja |
The homepage layout | Placement of the illustration and welcome text |
assets/site.css |
The paint and spacing | Colors, fonts, and layout details |
| The notebook and journal editors | Shared writing desks | Pages and posts |
content/wiki/ and content/blog/ |
Starter writing | The content shipped with your copy |
Keep template expressions such as {{ site_name }} intact: they are places
where the site inserts information. Change one thing at a time and check the
result in your browser.
The packages divide the work: web-user handles accounts, web-forum handles
discussions, and web-wiki and web-blog handle shared writing. Your project
brings them together under one design.
Share pictures
Copy images into content/images/. For a file named garden.jpg, write:

This works in the notebook, journal, homepage and forum. Restart after adding
image files, then use the filename in your writing. The site turns it into an
/images/... address and serves the picture locally. Image references start
from the image folder even when the page itself is in a subfolder.
12. Keep your community's work
Stop the server, start it again, and return to your discussion. Your account, posts, and browser edits remain saved.
Two local files matter:
| File | What it holds |
|---|---|
data/community.sqlite3 |
Accounts, sessions, discussions, pages, and posts |
data/community.keyset |
Keys used to protect private account information |
The database is like a filing cabinet; the keyset unlocks its protected records. Keep both when backing up the site. Stop the local server before copying them, and store the keys securely alongside your backup plan.
Browser edits are saved in the database. Restarting with unchanged starter files
preserves them. Editing a file in content/ imports that file's new text on the
next start, so use the browser editors for ongoing community writing.
Before inviting people to create real accounts, give the site its own email salt. This is a private random value used when looking up account email addresses. Generate it once:
openssl rand -hex 32
Save the result in a private site.ini:
[account]
email_hash_salt = PASTE_THE_GENERATED_VALUE_HERE
Start with that configuration:
ttrek run -script start -- --port 8081 --config site.ini
Choose this value before creating the accounts you intend to keep, then reuse it across restarts and include it in your backup plan. Treat the account created earlier in this walkthrough as a disposable practice account.
13. Prepare for AWS deployment
Install the AWS CLI, then configure your access key ID and secret access key in a named profile:
aws configure --profile community-site
aws sts get-caller-identity --profile community-site
Enter your intended AWS region and json as the output format at the prompts.
Check the returned Account and Arn to confirm the profile uses the intended
identity. Keep credentials in the AWS profile, outside the project files.
See AWS profiles
and checking your identity.
The next installment will cover putting the community online with HTTPS, PostgreSQL, email delivery, and persistent keys. For now, the site runs on your computer and the AWS profile is prepared for the deployment steps.
If something gets stuck
| What you see | What to try |
|---|---|
| The destination is not empty | Choose a different -outdir name or an empty directory. |
| A missing build tool | Install the named tool, then rerun ttrek install -y. |
| “Address already in use” | Choose another port, such as --port 8082, and open the matching URL. |
| The browser cannot connect | Keep the start command running and open the local URL it prints. |
| Startup asks for production settings | Run unset ENV in your local-demo terminal, then start again. |
| A verification code is rejected | Use the current code displayed in your own LOCAL session. |
| The sign-in form shows an image challenge | Enter the characters shown and submit the form again. |
| Editing controls are missing | Sign in with a verified account whose group has wiki.edit or blog.edit, and restart after configuration changes. |
| Moderation links or Manage users are missing | Check that the verified email is in a group with forum.moderate or users.manage, then restart the site. |
| A new post is missing from the public list | With moderation enabled, check Pending moderation and approve it with a reason. |
| The new community name does not appear | Save config.ini, stop and restart the server, then refresh. |